
 Facebook
 X
X
 Pinterest
 Copy Link
10 Tips When Moving With Kids

Moving is a stressful and uncertain time in your life, and it can be more so for kids, especially when they need to change schools, neighbourhoods or even countries. Informing your children about the move and following these few ideas might alleviate some stress.
Take Your Time
Allow extra time during all stages of the moving process with kids present. Tasks will take longer, and allowing spare time will help make each step less stressful. Moving and packing preparation time will also need extra time to prepare for additional events such as friends dropping by, temper tantrums, and other challenges. It might be a good idea to hire a professional moving company to allow you more time with your kids during the moving period. Not only can the moving company help transport your items, but they can also help with the packing and preparation process.
Transparent Information is Key
Inform your children about the move—don’t keep it a secret. When you know you are moving, tell your kids immediately. Tell them in an age-appropriate way and explain to them where you are moving and why you are moving, and what the new house has compared to this one. The sooner you give them specific information about the move, the sooner they can adapt to the upcoming changes. Give your kids ample time to prepare and absorb the news. Keep them aware of what’s going on during the moving process.
Making Things Concrete
When moving, please remind your children that everyone in the family is coming with them, even the pets. Also, let them know all their treasures and possessions will be moved. Explain that the changes might be challenging but will be a lot of fun. That it’s easy to visit family and friends, they miss from time to time, and video calling and other communication are still available. Describe the new home, bedrooms and fun things to do in it. Share information like what neighbourhood their new school is in, if you are moving closer to family and friends, and describe the home, schools, or the new city or country.
If your children are older, include even more details about the move, such as:
- The new address
- The name of their new school
- The neighbourhood
- The name of your and/or your spouse’s workplaces
Visit The New Home
It might not be possible to visit the new home, but seeing the city or town where you will be living in is a good idea. You can visit the new school and try fun activities to do in the area. When your kids can visualize a new life with you, it will take a lot of stress out of the move. Consider a mini vacation to the new city or country and keep things light and fun. Choose some activities that the kids will enjoy, like different parks, restaurants, and playgrounds. Finding places your kids will like in the new area will make them feel more comfortable.
Plan Fun Things
Before you move, plan to see close friends and family—this allows you to say “see you soon” instead of goodbye. Plan another time in the future when you have already moved to visit family and friends, so there is something to look forward to. When children anticipate seeing friends again, it will comfort them that time isn’t far away. Once moved in, plan for some fun things to do, such as allowing the child to pick a new toy or maybe get that new pet they have been thinking about for a while. A teen might enjoy a shopping trip to the mall in the new area.
Involve Kids in the Move
Involve the kids in the move, bring them to the homes you look at, and ask their opinions on the house and area it is in if they are old enough. Take their thoughts and desires into consideration. Let them pick their bedrooms in the home and help with decorating them. Creativity is a great way to boost their mood and get them excited to be in the new house. Before moving day, let your children help pack boxes. Helping pack their things will help make the move feel real and allow them to feel like they are a part of the process—hopefully making the transition easier.
Keep Their Favourite Items Unpacked
Comfort items like favourite toys, blankets or stuffed animals should be left unpacked. These items are essential to little ones and should be at hand to soothe them during stressful points of the move. The last thing you want is the comfort items to be packed away, and there is a melt down the day of the move.
Be Flexible
On moving day be flexible, and make the day as fun and stress-free as possible for your children. Spoil them with their favourite treats and a fun supper, like pizza. Don’t worry about this “special” day building bad habits. It’s a one-off day that won’t happen often. Toddlers can be especially challenging during moving days with all the uncertainty and strangers in their home. Let them play games or watch extra cartoons on a tablet to distract them from the things happening.
Find a Sitter on Moving Day
Having children out from underfoot during moving is crucial. Moving requires lifting heavy objects and boxes—often, large tools and machines are involved in the move, and it can be unsafe for children to be present. The best option on moving day, and even the days leading up to it, is to let them stay with a friend, have the grandparents take them for a sleepover or hire a sitter to be with your children. Doing this will help you and/or the movers do their job uninterrupted and give your kids a fun, joyous day!
Stay Positive
Not only is it best to stay positive for your mental health, but for your kids as well. Situations can be stressful while moving, and it’s essential to keep your cool. Make this a positive family adventure, and don’t sweat the small stuff.
Consider a few of these ideas about how to make your move less stressful with kids, and remember to let them be involved in every step of the process and keep them informed at all times.
If you need help moving into a new home or selling yours, contact your local REALTOR® today.
Halloween Treat > Caramel Apples
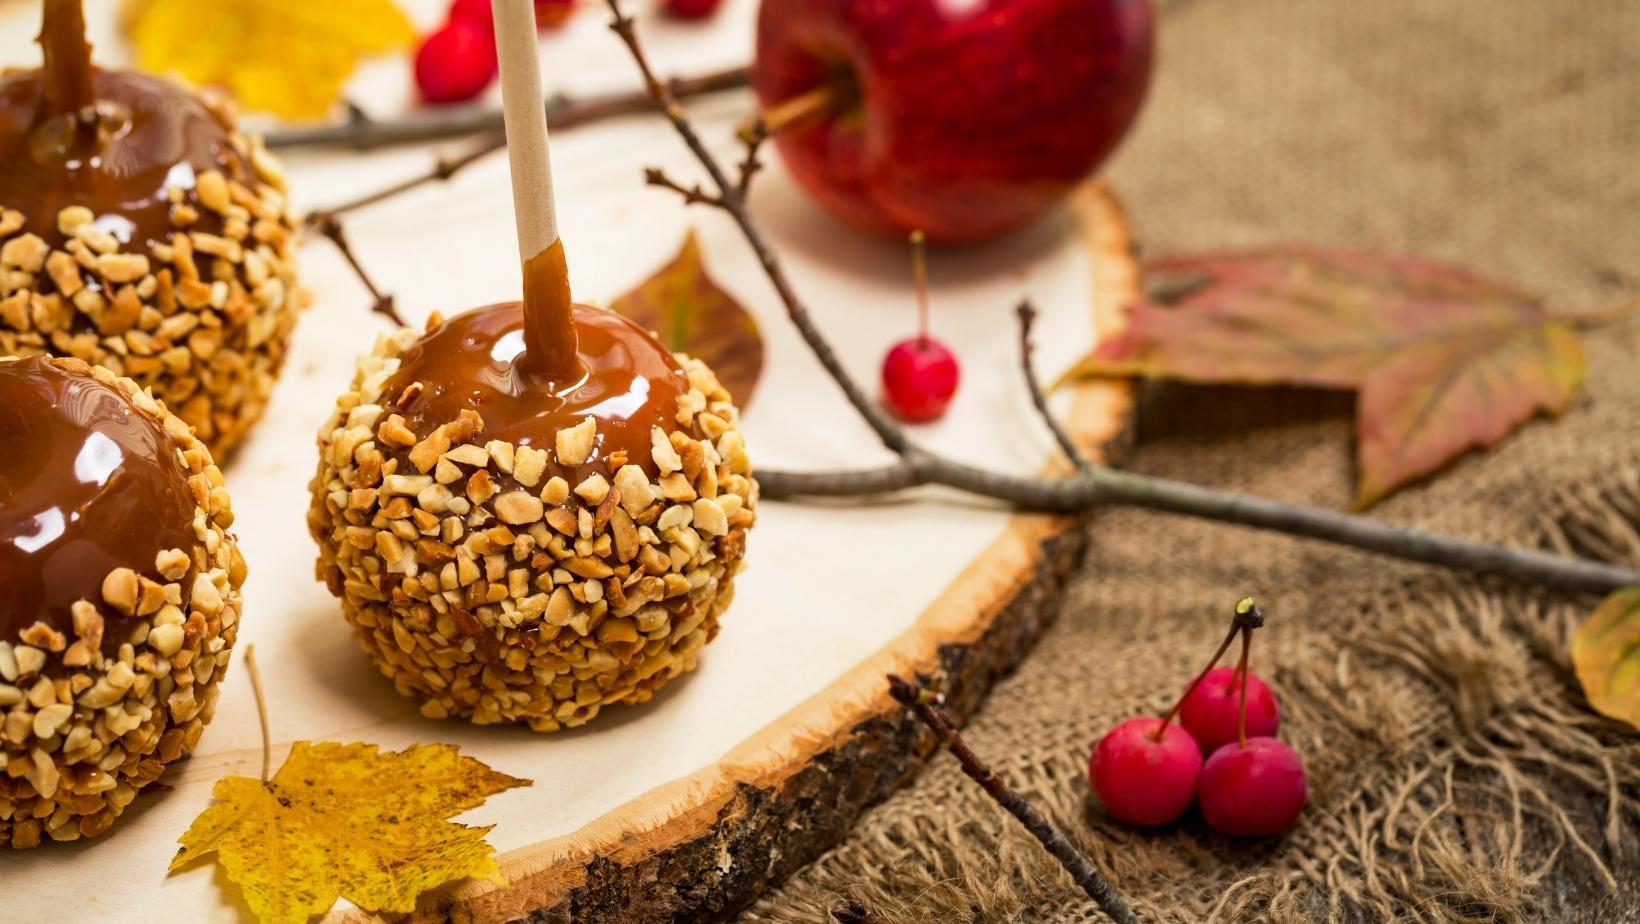
Since Halloween is coming up this Monday, I wanted to share my all-time favourite Halloween treat. My mother and I made them when I was a kid, and we gave them out to trick-or-treaters. Those days are gone, but the nostalgia still lives on.
Caramel apples are a super versatile treat. They are crunchy, creamy and delicious. Eat them plain or enjoy them with various toppings, like peanuts, melted chocolate, cookie crumbs, marshmallows or other delectable treats.
Before we begin, I want to warn you that making these can get quite messy and be prepared for a complete kitchen clean-up, but trust me, it’s worth the mess.
Apples that work best for this recipe are crunchy, firm apples, like granny smith, fuji or even my favourite honey crisp! Choose a small to medium-sized apple that is firm and round, with no soft spots.
After your apples are selected, you will need:
-a candy thermometer
– a heavy-bottomed saucepan
– a wooden spoon
– strong wooden sticks: we will be stabbing these into the apples, and they will act as the handle for the apple
– a pastry brush: to push the sauce down into the pan and remove the excess caramel from the apples
Ingredients:
8–9 cold apples
1 and 3/4 cups (420ml) heavy cream
1 cup (240ml) light corn syrup
2 cups (400g) packed light or dark brown sugar
1/4 cup (4 Tablespoons; 60g) unsalted butter, at room temperature
1/2 teaspoon salt
1/2 teaspoon pure vanilla extract
Instructions:
Prep:
- Wash the apples thoroughly. Scrub them to remove as much wax coating off as possible to help the caramel stick better. (organic apples with no wax coating might work nicely for this too).
Remove the apple stem so that the stick can be inserted into the apple easily later.
- Line a baking sheet with a silicone mat. Or grease the baking sheet with butter.
DO NOT use wax paper or parchment paper, as the caramel will stick to it.
Make the Caramel dip:
- Combine the heavy cream, corn syrup, brown sugar, butter, and salt in a 3-quart heavy-duty saucepan over medium heat.
Do not turn the temperature up or down– keep it at medium the entire time the caramel cooks.
Stir constantly with a wooden spoon until the butter is melted.
Once melted, brush down the sides of the pan with a water-moistened pastry brush and attach a candy thermometer to the pan, making sure the bulb is not touching the bottom of the pan (as you’ll get an inaccurate reading).
- Without stirring, let the mixture cook and bubble until it reaches between 235°F – 240°F.
Reaching this temperature should take about 15 – 20 minutes, though don’t use time as your guide because it depends on your stove.
Don’t be alarmed if your caramel is taking longer. Just use the candy thermometer as your guide.
The temperature will heat up slowly, then move quickly, so keep your eye on the pot.
Once at 235°F – 240°F, remove the caramel from the heat and stir in the vanilla.
Avoid over-stirring, which can create air bubbles in the caramel (and then on the apple).
Allow caramel to cool for 10-15 minutes until slightly thickened.
If caramel is too thin to coat apples, let it cool and thicken for 5-10 minutes longer.
Dip the Apples:
- Holding the caramel apple stick, dip the apple into the warm caramel, tilting the pot as needed to coat all sides of the apple.
Lift the apple up and swirl it around or gently tap it against the pot’s side to let excess caramel drip off.
***After dipping the apple in the caramel. If using extra toppings, place toppings on a shallow pile on a plate and roll the apple around in the toppings.
Place coated apples on the prepared pan.
Repeat with remaining apples.
Enjoy immediately or allow caramel to set about 45-60 minutes.
If you want to wrap the caramel apples in cellophane treat bags for travel/gifting, wait until the caramel has been completely set.
- Once completely cooled for displaying or serving, place the apples on wax paper or another nonstick surface.
Even when the caramel has been completely set, caramel apples may slightly stick to a serving dish.
To eat a caramel apple, you can bite right into it or sit it upright on a cutting board and cut slices around the stick. (Or pull out the stick and slice.) These are great for sharing!
- Loosely cover and store the leftover dipped apples in the refrigerator for up to 1 week.
Bonus Tips:
How to clean a sticky saucepan:
It’s not always easy or fun, but I have a helpful solution! When you’re finished making sticky caramel, simply fill the dirty saucepan with water until the water covers all of the candy residue. Place the saucepan on the stove over low heat. Let the warm water simmer and melt the sugar off the sides of the pan. Pour out the warm water, then let the tools sit until cool enough to handle. Rinse clean.
DO NOT double Batch:
I don’t recommend halving, doubling, or tripling candy recipes, especially this caramel.
Increasing or decreasing the quantity may work for baking, but the extra or decreased volume could prevent the candy from cooking properly.
Make separate batches instead.

