
 Facebook
 X
X
 Pinterest
 Copy Link
My Fave: Jacques Torres Chocolate Chip Cookie Recipe

I found this Jacques Torres cookie recipe years ago, and I try to make them every Christmas. Not only is it an all-time favourite cookie of mine, I also have family and friends request that I make them.
They are soft, chewy and delicious—a real show-stopper. They take longer to make than standard cookies, but they are worth the fuss.
TOOLS:
Large Bowl
Whisk
Stand Mixer
Baking Sheet
Parchment Paper
Cookie Scoop (if you have one)
RECIPE:
Ingredients:
- 2 cups minus 2 tablespoons (8 ½ ounces) cake flour
- 1 2/3 cups bread flour
- 1 1/4 teaspoons baking soda
- 1 1/2 teaspoons baking powder
- 1 1/4 cups butter, room temperature (I used salted)
- 1 1/4 cups light brown sugar
- 1 cup plus 2 tablespoons granulated sugar
- 2 large eggs
- 2 teaspoons pure vanilla extract
- 1 ¼ pounds chopped dark or semi-sweet chocolate chunks or disks
- flaked sea salt to sprinkle
Instructions:
- In a large bowl, sift together (or whisk) the cake flour, bread flour, baking soda, and baking powder. Set aside.
- In the bowl of your stand mixer fitted with the paddle attachment mix the butter, brown sugar, and granulated sugar together for 5 minutes, until light and fluffy. Add in the eggs one at a time until mixed, and then vanilla. Continue mixing for an additional minute, scraping the sides as necessary.
- Turn the mixer to low and add the flour mixture until just combined. Fold in the chocolate until evenly incorporated. Cover and chill dough for 24-72 hours.
- When ready to bake, preheat the oven to 350°F. Line a baking sheet with parchment paper.
- Allow the chilled dough to sit at room temperature for 20-30 minutes before baking to soften slightly. Scoop out 3.5 ounces of dough for each cookie using a large cookie scoop—approximately 1/4 cup. Place mounds onto your baking sheet, spacing them 3- inches apart.
- Bake cookies for 15-18 minutes until the edges are golden. Turn your baking sheet 180- degrees once, halfway through baking.
- Remove from the oven and immediately sprinkle with sea salt. Allow the cookies to cool on the baking sheet for 5 minutes before transferring them to a wire rack to cool completely.
Notes:
- Instead of chilling the dough in a large bowl, you can scoop and measure it right away and chill it in prepared mounds on a large baking sheet until ready to bake. Baking chilled dough produces a slightly thicker cookie than room-temperature dough.
- Store airtight for up to 3 days. Or put them in an airtight container and store them in the freezer.
Nutrition
Serving Size: 1 Cookie Calories: 222 Sugar: 9.6 g Sodium: 91.4 mg Fat: 12.2 g Carbohydrates: 25.7 g Protein: 2.7 g Cholesterol: 49.1 mg
I hope you enjoy these cookies as much as I have over the past ten years! They melt in your mouth once baked; eating the cookie dough is equally delicious!
If you need a larger kitchen to make these cookies in, contact your Local REALTOR® today!
Halloween Treat > Caramel Apples

Since Halloween is coming up this Monday, I wanted to share my all-time favourite Halloween treat. My mother and I made them when I was a kid, and we gave them out to trick-or-treaters. Those days are gone, but the nostalgia still lives on.
Caramel apples are a super versatile treat. They are crunchy, creamy and delicious. Eat them plain or enjoy them with various toppings, like peanuts, melted chocolate, cookie crumbs, marshmallows or other delectable treats.
Before we begin, I want to warn you that making these can get quite messy and be prepared for a complete kitchen clean-up, but trust me, it’s worth the mess.
Apples that work best for this recipe are crunchy, firm apples, like granny smith, fuji or even my favourite honey crisp! Choose a small to medium-sized apple that is firm and round, with no soft spots.
After your apples are selected, you will need:
-a candy thermometer
– a heavy-bottomed saucepan
– a wooden spoon
– strong wooden sticks: we will be stabbing these into the apples, and they will act as the handle for the apple
– a pastry brush: to push the sauce down into the pan and remove the excess caramel from the apples
Ingredients:
8–9 cold apples
1 and 3/4 cups (420ml) heavy cream
1 cup (240ml) light corn syrup
2 cups (400g) packed light or dark brown sugar
1/4 cup (4 Tablespoons; 60g) unsalted butter, at room temperature
1/2 teaspoon salt
1/2 teaspoon pure vanilla extract
Instructions:
Prep:
- Wash the apples thoroughly. Scrub them to remove as much wax coating off as possible to help the caramel stick better. (organic apples with no wax coating might work nicely for this too).
Remove the apple stem so that the stick can be inserted into the apple easily later.
- Line a baking sheet with a silicone mat. Or grease the baking sheet with butter.
DO NOT use wax paper or parchment paper, as the caramel will stick to it.
Make the Caramel dip:
- Combine the heavy cream, corn syrup, brown sugar, butter, and salt in a 3-quart heavy-duty saucepan over medium heat.
Do not turn the temperature up or down– keep it at medium the entire time the caramel cooks.
Stir constantly with a wooden spoon until the butter is melted.
Once melted, brush down the sides of the pan with a water-moistened pastry brush and attach a candy thermometer to the pan, making sure the bulb is not touching the bottom of the pan (as you’ll get an inaccurate reading).
- Without stirring, let the mixture cook and bubble until it reaches between 235°F – 240°F.
Reaching this temperature should take about 15 – 20 minutes, though don’t use time as your guide because it depends on your stove.
Don’t be alarmed if your caramel is taking longer. Just use the candy thermometer as your guide.
The temperature will heat up slowly, then move quickly, so keep your eye on the pot.
Once at 235°F – 240°F, remove the caramel from the heat and stir in the vanilla.
Avoid over-stirring, which can create air bubbles in the caramel (and then on the apple).
Allow caramel to cool for 10-15 minutes until slightly thickened.
If caramel is too thin to coat apples, let it cool and thicken for 5-10 minutes longer.
Dip the Apples:
- Holding the caramel apple stick, dip the apple into the warm caramel, tilting the pot as needed to coat all sides of the apple.
Lift the apple up and swirl it around or gently tap it against the pot’s side to let excess caramel drip off.
***After dipping the apple in the caramel. If using extra toppings, place toppings on a shallow pile on a plate and roll the apple around in the toppings.
Place coated apples on the prepared pan.
Repeat with remaining apples.
Enjoy immediately or allow caramel to set about 45-60 minutes.
If you want to wrap the caramel apples in cellophane treat bags for travel/gifting, wait until the caramel has been completely set.
- Once completely cooled for displaying or serving, place the apples on wax paper or another nonstick surface.
Even when the caramel has been completely set, caramel apples may slightly stick to a serving dish.
To eat a caramel apple, you can bite right into it or sit it upright on a cutting board and cut slices around the stick. (Or pull out the stick and slice.) These are great for sharing!
- Loosely cover and store the leftover dipped apples in the refrigerator for up to 1 week.
Bonus Tips:
How to clean a sticky saucepan:
It’s not always easy or fun, but I have a helpful solution! When you’re finished making sticky caramel, simply fill the dirty saucepan with water until the water covers all of the candy residue. Place the saucepan on the stove over low heat. Let the warm water simmer and melt the sugar off the sides of the pan. Pour out the warm water, then let the tools sit until cool enough to handle. Rinse clean.
DO NOT double Batch:
I don’t recommend halving, doubling, or tripling candy recipes, especially this caramel.
Increasing or decreasing the quantity may work for baking, but the extra or decreased volume could prevent the candy from cooking properly.
Make separate batches instead.
6 Tips for Selling Your Home

Do you plan on selling your home soon? Whether you are selling to accommodate your growing family or retiring and downsizing to a smaller home. This helpful guide will give you a few hints and tips to make selling your home a breeze.
Should You Hire a Real Estate Agent?
Whether you sell your home privately or with a listing agent is entirely up to you. Both choices come with various pros and cons.
If you choose to sell privately, there are no real estate agent fees, but the time and energy needed to try to sell your home this way might not be worth it. A realtor will have many connections, experience and knowledge that you, as a homeowner, lack. They are an excellent liaison between the two parties, know how to fill out paperwork and will have a network of buyers and the best inspectors and lawyers.
Whether you choose a real estate agent or sell privately, these tips will still be helpful.
Tip 1: Know the Market
The real estate market fluctuates a lot. It can be hard to know the climate of the market and who has the advantage if it’s the seller or the buyer. Check real estate reports to know if the market favours the seller or the buyer. If the market favours the seller, there will be low inventory and the quick sale of homes. If the market favours the buyer, there will be an abundance of inventory and a slow sales rate, with homes sitting on the market for weeks to months. This depends on the economic situation, national interest rates, location, and other factors.
Tip 2: Decide on a Listing Price
One of the best tips before selling your home is evaluating its worth in the current market. Your realtor can provide a Comparative Marketing Analysis at no extra cost. This analysis will look at a combination of factors, including features of your home, upgrades or renovations, the tax-assessed value of your property, and the selling price of comparable homes in your area.
Tip 3: Pick the Right Season
The season when you sell your home is equally as important as picking a listing price. There are pros and cons to selling in winter and warmer months.
Winter has lower inventory overall, so attracting buyers and offers is easier. There are a few drawbacks to selling in winter, though. Snowfall can make it hard for buyers to view your home and hide important features such as foundation and landscaping—let’s face it, moving also sucks in winter. Try to list in autumn before the first snowfall to avoid this issue.
Spring and Summer usually have the highest amount of inventory to hit the market. An active market with more competition for you as a seller. This might be the ideal time for you to sell your home. Consider listing your home at a competitive price to attract more offers if that is the case.
If you are not looking for a quick sale, try listing your home in autumn. It is a great time to list because summer is winding down. It is easier for your home to stand out as fewer homes are on the market. There is changing leaves everywhere in autumn to enhance the beauty of your neighbourhood.
Tip 4: Staging & Marketing
Staging is not only a great way to show off the potential of your house to prospective buyers but also makes the home very appealing in the listing photos.
Start by decluttering things you don’t need every day and de-personalize the space. If this seems overwhelming, there are many home staging businesses out there that can help you.
Click here to open a comprehensive guide to staging your home.
To market your home, include these details in your listing:
- Good quality professional photos
- Photos of your home’s exterior and yard in various seasons–focus on exciting features like a tiered deck, pool, etc.
- Drone aerial Photography and videography of the property and neighbourhood. This can significantly improve the potential for a sale by up to 70%.
- Showcase interesting details and wow features of your home. (fireplace, finished basement, kitchen upgrades, etc.)
- Provide information about amenities, schools, shopping in the area, and walkability to these places.
- Bonus if you can have a video virtual tour or 3d tour of your home created for you.
Tip 5: Showing Your Home
Most interested buyers want to see a home in person. There are a few ways to accomplish this: an open house for multiple showings at one or scheduled showings.
Before viewers arrive, try to put things away and deep clean them beforehand.
Tip 6: Offers
In an ideal world, you would get multiple offers on your home, and you can select the best one for you. You can accept, counter or reject any offers you receive. Look out for offers that have unappealing conditions or contingencies that must be met before the sale goes through. The buyer’s conditions could be various asks, the most common being a home inspection, secured financing or the sale of their own home.
Review the paperwork with a lawyer when you get the right offer and are ready to accept it. There might be additional requests before the buyer agrees to close, such as including all appliances or requesting a repair. Your lawyer will ensure the paperwork goes through to the transfer of ownership.
Now that you have read through this selling your-home guide, I hope you feel a little more comfortable starting the process yourself.
If you are looking into selling and/or buying a new home enlist the help of a trusted REALTOR® to help you through the process.
7 Fall Decorating Trends
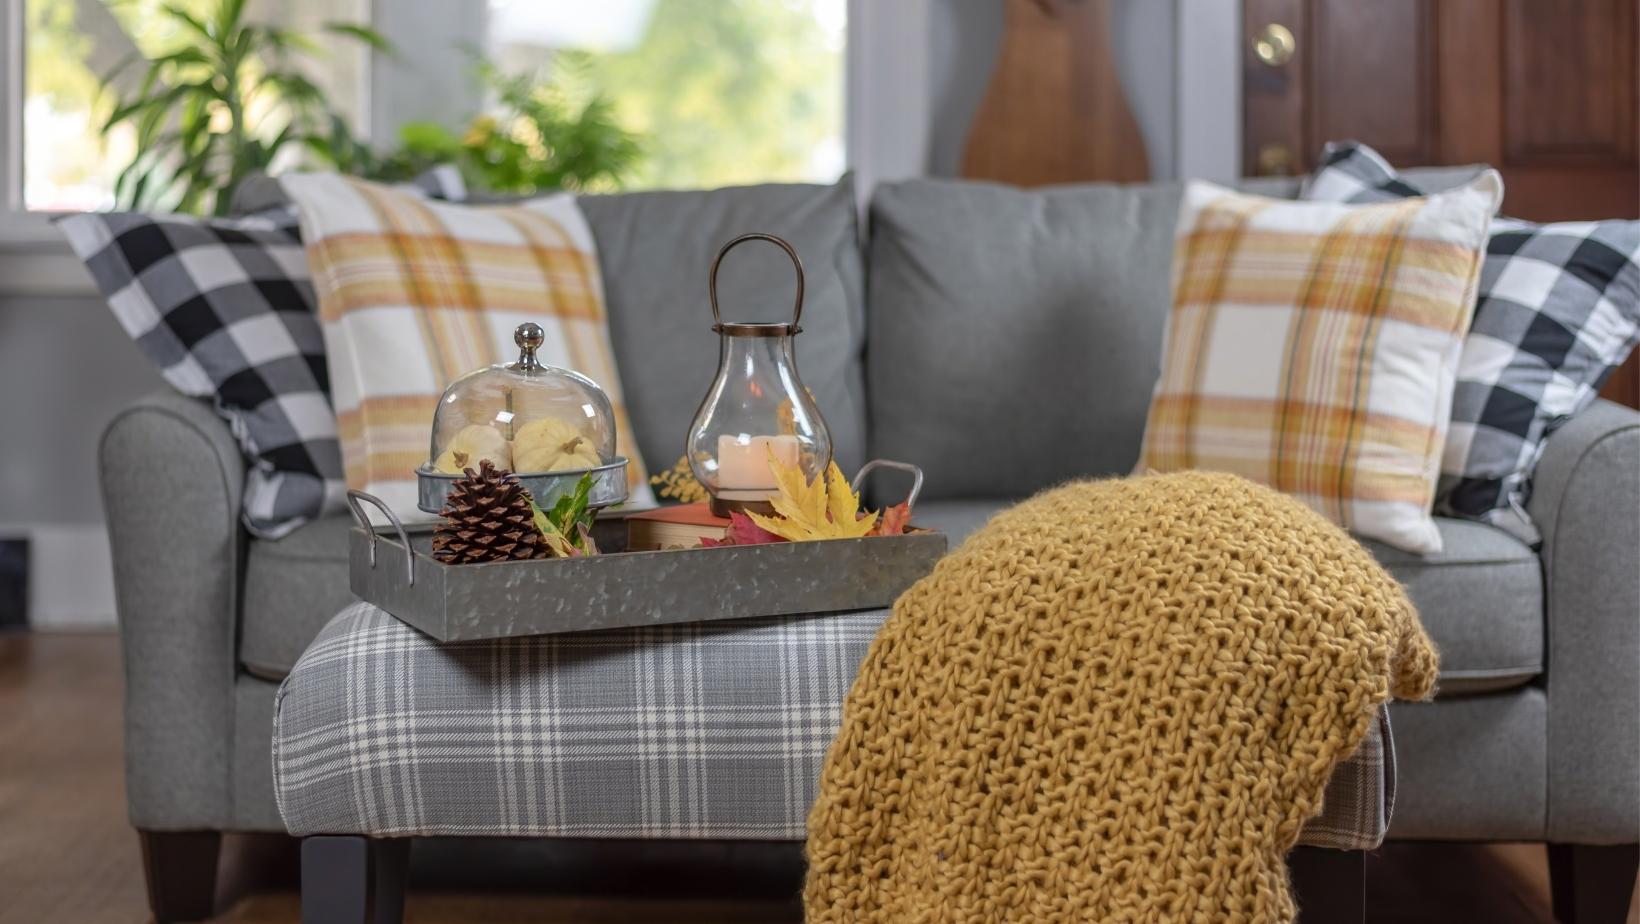
Autumn is a beautiful time to slow down, reflect and wear a scarf. Your wardrobe is getting cozy, and your home is also a place to add warmth. It’s time to change your summer decor for bold, dark colours, rich woods and textured blankets. Refreshing your home for fall doesn’t have to be expensive. Here are a few inspirational trends to help you get started.
1. Fall Porchscapes
Porchscapes are forecasted to be the hottest trend of the season. The easiest way to bring the fall to your doorstep is with pots of mum flowers and a scattering of pumpkins. To elaborate on this trend, try a mixture of lanterns, wooden signs and twinkling lights. Other than adding a lot of curb appeal to your home with porch arrangements, it also is the time when people get together outdoors.
If you have an oversized porch, you can quickly add a table and chairs, invite guests, and have an instant setting to entertain.
2. Earthy, Nature-Inspired Colours
Oranges, reds, and yellows come to mind when thinking about Autumn, but if these colours are too vibrant for you, there are a few other colours to consider. If neutrals appeal to you more, try decorating with browns and tans. For a more rich colour palette, explore navy, greens and chocolates. Using these colours will elevate your space and add a sense of luxury. While these tones aren’t classic fall colours, they are worth trying.
If you still prefer the classic colours for Autumn, try one or two earth tones to mix things up. Experiment with pillows in navy or greens, or line your table with a bold runner to contrast with the orange and yellow decor. Try integrating metals like gold and bronze to add more flare to your space.
3. Entertaining-Ready Spaces
Following almost three years of enduring a pandemic, people are looking forward to the holiday seasons again by preparing their homes for entertaining. Living rooms and dining rooms should be the primary focus for autumnal decorating. This season engages all five senses by experimenting with textures, like comfy blankets and pillows, candles or oil diffusers, visually pleasing decor like pumpkins and fun place settings. Get all things cozy this fall and winter!
4. Textural Fabrics
Try laying out some throws and textured pillows for the ultimate cozy vibes as it gets colder. Think chunky knit blankets and pillows in velvet materials or with tassels, and incorporate rich colours to welcome the fall season. Refreshing your sofa or bedding can be as easy as adding a layer of bold-coloured pillows and throwing on various textures.
5. Cozy Sanctuaries
In the past few years, most of us have been at home longer than usual and are seeking coziness over style—why not achieve both? Take the cooling of temperatures as a sign to create a comfortable place to rest after a long day. Outfit a chair or a window seat with a lush pillow and a textured throw, and add a few books next to it and a candle for the ultimate comfort.
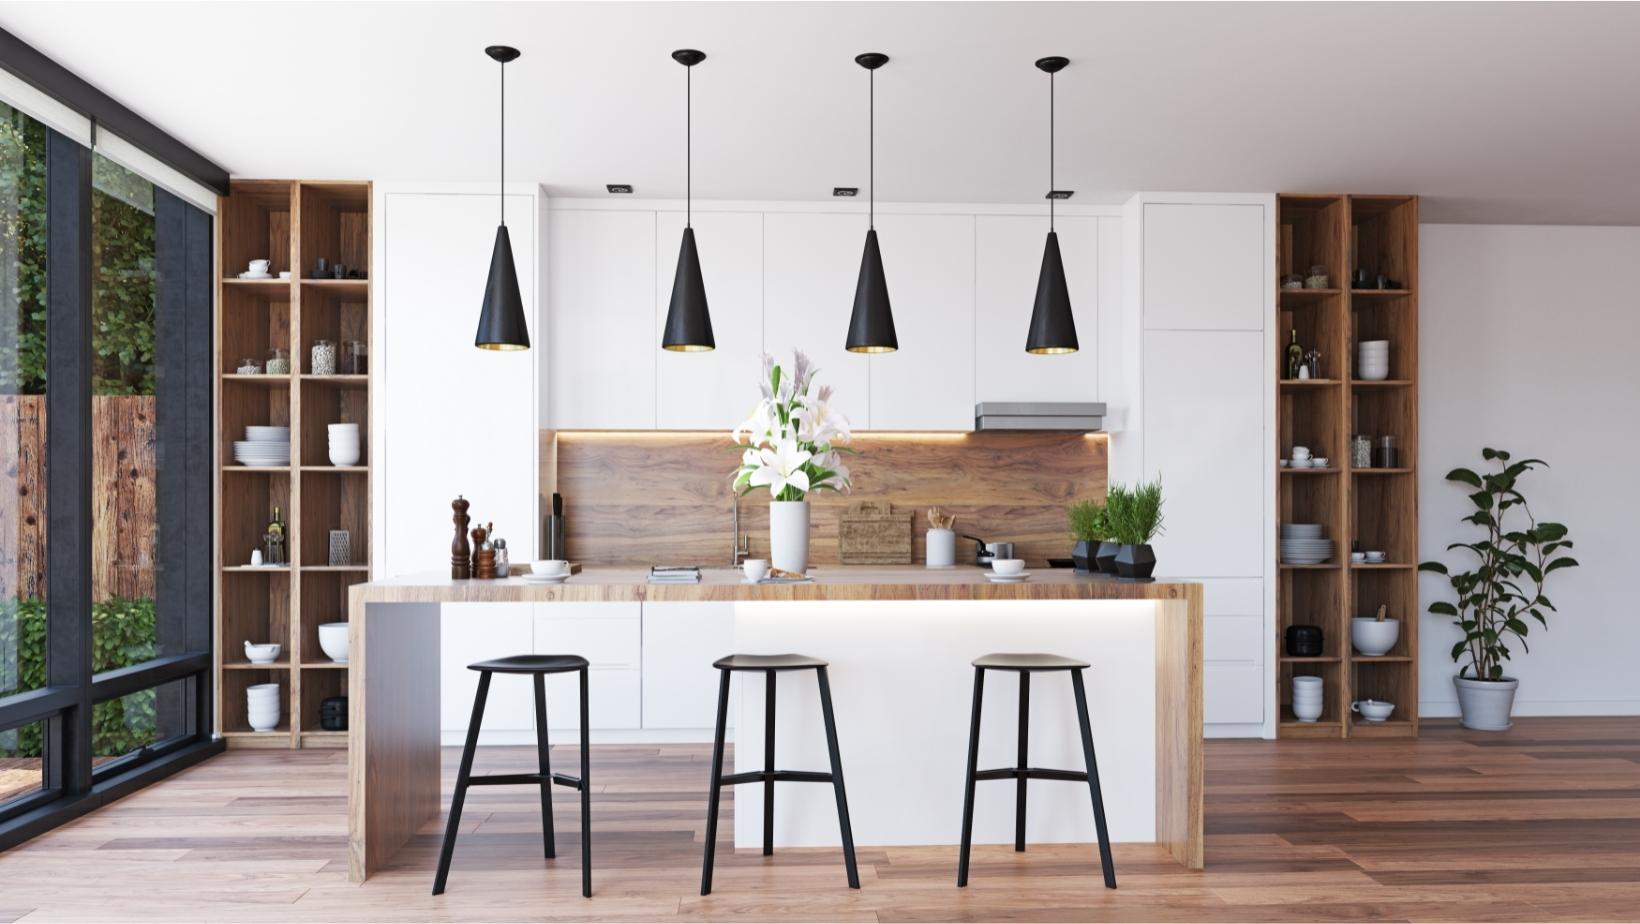
6. Dark Kitchens
Dark kitchens are slowly returning in the last year or two, which is exciting. White kitchens have had their moment, but it’s time for a change. Autumn is a great time to renovate or experiment with bold colours in the kitchen. It’s time to update your kitchen with warm earth tones and deep jewel tones.
If you want a simple and inexpensive kitchen renovation, install a new dark tile backsplash in various colours or textures. Additionally, you could change out your faucets and lighting fixtures for bronze or gold tones to usher in those fall vibes.
7. Bold Patterns that Add Personality
Bold patterns are a great way to add personality to any space. Start by adding patterns to smaller rooms such as mudrooms, bathrooms or even hallways to spark happiness. Adding a stunning texture wallpaper with bold colours and patterns is a surefire way to liven up any space. If hanging permanent wallpaper scares you, trying a vibrant paint colour will also do the trick. Add an accent rug to a hall or mudroom to bring coziness and a pop of colour.
Enjoy these autumnal ideas and decorating tips inside of your home this fall. It’s as easy as adding an earth-tone colour, various textures and a sprinkling of coziness.
Don’t forget to maintain the outside of your home and prepare it for fall.
Contact your local REALTOR® to find a fabulous home to decorate for fall.
Creative Home Staging Tips
It’s essential to showcase your home in the best way possible to potential home buyers. The more staging the home has, the more people will be interested in viewing the house and then buying it. Here are a few staging tips to consider before taking photos of your home and also opening your home for viewings.
Areas of Influence
Curb appeal is the first place to start when staging your home, and the first impression people have—think of a nice green lawn, flowers and trimmed trees. Inside the best areas to stage are the most high-traffic rooms, such as the kitchen, living room, main bathroom and primary bedroom.
New Perspective
Try rearranging your furniture or removing pieces of furniture to open up the space. We see our homes the same way daily and grow accustomed to the layouts. But what will potential buyers see? Move furniture around to create a nice flow through the house so that viewers can see the space’s potential. If you are unsure how to accomplish this, call in the professionals.
Keep it Simple
Staging doesn’t have to be expensive. One affordable staging option is to remove personal items and clutter. Simplifying the objects in your house and decorating them with key pieces will appeal to more buyers.
Curb Appeal
A buyer first sees the front yard and entrance to your home. Ensure your lawn is mowed, trees are trimmed, and walks are swept. No need to re-landscape your whole yard, but having a tidy yard will pay off in dividends. Some other great suggestions include power washing all the siding, eaves, decks and driveways. Paint the front door a bright colour that compliments your home. Replace or paint any diminishing features of the house, and spread out an inviting welcome mat while you’re at it!
Kitchens
Kitchens are the feature that attracts most home buyers. Create an inviting space by deep cleaning your kitchen, including inside cabinets and behind appliances. Make the handles and appliances sparkle. Remove countertop appliances that aren’t used or kitchen clutter, like paper towel dispensers, to show off the counter space. Stage the kitchen with vibrant fruit bowls or well-appointed objects. Organize and destash your cupboards, so everything looks in order and has the appearance of lots of space.
Furniture Placement
Furniture placement can make or break your buyer’s experience. Your space will look cluttered and small if there is too much furniture. Create a mood in each room with the furniture, typical furniture along the walls is dull, adding a bit of life to the house by changing the placement. Clean furniture and crisp bed coverings are a great way to make a home feel inviting. Show off the best features of your house by strategically placing furniture around fireplaces or great architectural details. Lines of sight to the windows will make all the rooms feel bright and more open.
Bedroom Makeovers
A tremendous primary bedroom adds a lot of value to a home and will bring a sense of comfort to potential buyers. Everyone wants to sleep in an oasis, and it can be effortless to transform your bedroom into one. The bed is the main focal point of any bedroom, so make sure the bedding is tucked in and clean—make it feel like a hotel room. Another nice add-on would be creating symmetry with matching nightstands and lamps.
Set the Mood with Light
Lighting is so important when selling a home. Before showing the home ensure all the curtains are open to flood the space with light and warmth. Replace all light fixture bulbs with warm ones, so every room has consistent lighting. If possible, have a few types of lighting, ranging from ambient, task and accent lights—having a variety of lights set the perfect mood for night or day showings.
Keep Things Fresh
You may want to add some greenery to your home to add a bit of coziness and life, however, steer away from plastic plants and flowers. Opting for natural plants and flowers is great for staging and creating life in your home.
Finishing Touches
The finishing touch on staging your home is removing all your personalized items so that homebuyers can have a blank slate to envision their stuff in it. Replace family photos with generic artwork. If you have decluttered everything, try adding back in some texture pillows and throws. Simple objects staged together in groups of three can showcase features of your home, like the fireplace mantle or built-in bookshelves. Play with scale, colours, shapes and textures of items to engage people’s interest.
Taking the time and effort to stage your home will be worth it when you sell it quickly. Following these staging tips will help you show off your home’s best features, and with any luck, you will be able to sell your home for top dollar. The more presentable your home is, the more it will stand out from the competition and elevate the perception of its value.
If you are interested in buying or selling your home, contact your local REALTOR® today!
Home Renos to Complete Before You Move In
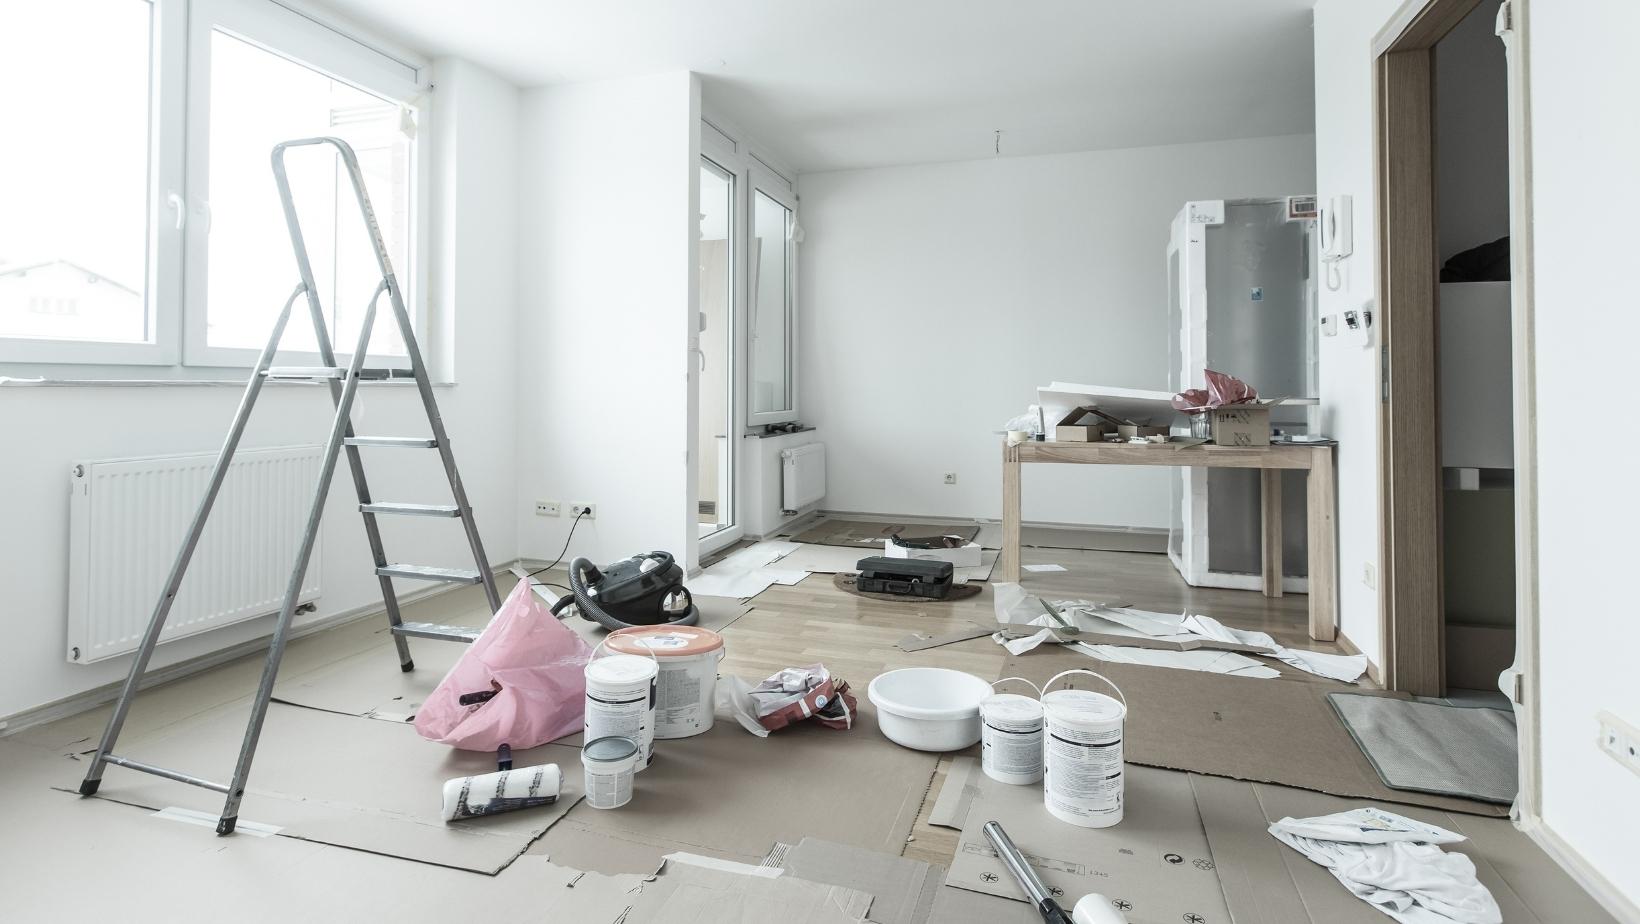
Here is a small list of home renovations that would be nice to complete before moving into your new home. These things will disrupt your life the most if completed while living in your house. If you can, plan to renovate these areas before you move in to maximize the enjoyment of your new place.
Paint the Walls
The best part about purchasing a home is being able to make it your own and getting a fresh start. A coat of paint will infuse your personality into the space, and what’s better than painting without the obstacles of furniture? It is also ideal to avoid dreaded paint fumes and let the house air out before moving in. Painting rooms beforehand will allow you to live in your new home without the added stress of trying to move in and paint simultaneously.
Floor Refinishing or Changing the Floors
Chances are, if you are moving into a house, the floors will be in good condition, but what if they are dated or damaged? Replacing dated floors or refinishing existing ones before moving in is an excellent idea–this will help avoid damaging the new finish on the flooring and dust from removing carpets and installing new ones. You can attempt a project like this yourself, but allow extra time for errors and materials shipping. Involve professionals if you are uncomfortable tackling the floors and if your budget allows. Always make sure to have a solid plan in place before starting. Decide on the style and material of flooring you want and budget for extra costs.
Renovate the Kitchen
When purchasing a new house, it might be dated and not perfect. If you love the location and style of the house, but the only issue is the dated kitchen, it might be worth renovating it before moving in. Living in a construction zone and being unable to prepare meals for the first months in your home is not ideal. Before you get started, make a list minor to more significant updates you want to make to the kitchen, then decide on how much time it will take to finish them. Don’t forget to allow ample time to clean up the mess from construction before you move in.
Renovate the Bathroom
Similar to the inconveniences of not having a kitchen is not having a bathroom. It is probably the most troublesome renovation in your home, primarily if only one bathroom exists. If there are any problems with the bathroom in the house you are moving into or you want to renovate it, the best time would be before you move in. Like the kitchen renovations, make a list of larger and smaller projects, the amount of time each will take to complete, and plan accordingly. Hiring contractors can make this job smoother and stress-free than trying to renovate it yourself.
Renovate the Bedroom
The main bedroom should be a place of rest and relaxation. A few updates before moving in could make your bedroom the ultimate escape. Whether it is a few minor cosmetic updates or a complete overhaul, make it a priority to finish before moving in. Not having a designated bedroom is another room in the house that can be inconvenient if not move-in ready (not exactly sure how this sentence is supposed to read?, lol). Hiring professionals for this project will also be beneficial to finish it on time. If you choose to renovate yourself, account for setbacks and multiple trips to the decorating and hardware stores.
Installing a Furnace or Air Conditioner
There’s nothing worse than faulty equipment regarding heating and cooling. After getting your home inspected and if the furnace is older, think about replacing it before you move in. The same can be said for air conditioning. Decide if you want it installed before moving in. Installing or updating these will alleviate the headache of living in a construction zone and the loud noises that accompany it. Plus, you could negotiate a lower selling price by getting the old homeowners to include these as-needed upgrades. Or take more out for the mortgage through the bank.
Here are just a few things to think about renovating before moving into your new home. Renovations will give your home a refresher and infuse it with your style. Finishing specific renovations or home repairs before you move in will allow you to settle into your new home and enjoy it from the start.
If you need help finding the perfect home, contact your local REALTOR® today!

